Tuesday, 18 December 2012

Filofax Flex Conversion

All bold type are clickable links

Since getting my Midori Traveler's Notebook, I have obsessed a little on making another.  I had a go at making a fake leather one, and though it turned out okay, I was not that happy with it.  Yesterday I went on a hunt....covering 4 towns looking for some leather....I couldn't get it anywhere, but what I did get was a Black A5 Flex by Filofax. TKMaxx are selling these at a ridiculous low price of £7.99.  I already own a Magenta one, but I paid £27 for this one last year and I wasn't prepared to "alter" it. lol
So here is what I did.  I punched 3 holes in the top and bottom and threaded some elastic through the holes, like I did on my fake Traveler's notebook.


Again I added some little beads for decoration purposes.

Next I added some notebooks, a Rhodia  and a Julia Rothman (I bought from John Lewis)


Then I slipped the grey notebook, that came with the flex, into the back cover to add some stability.


The notebooks just slot behind the elastic.

This is how it looks closed.


I needed something to keep this altogether and after seeing a Papelote pen holder, I thought I would have a go at making one of these too......well after all, this is a DIY project!  I only had black elastic to work with, so I used a contrasting colour cotton.  This was roughly done, but I guess with a bit more time and patience I could make a nicer looking one.

With some pens added....I love these Frixion pens but decided against using them for Journaling, after all, I would hate all my entries to disappear if I placed the journal near a heat source!

I'm pretty pleased with my Flex makeover, now I have 3 Notebook/Journals in one place!


Saturday, 15 December 2012

DIY Traveler's Notebook

A few days ago I bought a Midori Traveler's Notebook, I love it!  The design is so simple, I managed to make a couple of copies today in under an hour.  Not quite the elegance of the Midori but it's a cheap alternative.  I would have loved to of used real leather, but finding 2mm thick leather..... well let me tell you, it would be easier searching for gold!

First a trip to Hobbycraft to buy some Pleather (artificial leather).  It cost approx £3 for half a metre and I got some shearing elastic for £2.  I won't do a full tutorial of how I put it together, it's pretty straight forward.   I cut a long piece of Pleather and folded it in half, glued it together then with a awl and hammer added some holes in the right places.  You may notice though, on this one, I put the middle fastening elastic on what will be the spine (as opposed to the back cover which Midori do.)

I also put in four lengths of elastic, so I can add more note booklets. 

The fastening knot at the bottom, I later added a few decorative beads.

My homemade inserts....Tutorial is here


The first one I made I just used the Pleather, the second one, I added a piece of card before folding it, to give it some firmness.  They are not as good as the real thing, but if you are on a budget and don't want to spend £40 on the Midori cover, then have a go at making your own.  It really is easy and for a fiver, I can easy got another 2 larger notebooks out the Pleather I have left.  Or, if by some miracle you find 2mm leather, make a better one!
Oh and I made this a little larger than the original Midori Traveler's Notebook because I wanted to add a few more booklets and some inserts from My Life All In One Place.  If you haven't read Ray's blog, check it out they are some amazing tutorials on there.


Hope you enjoy, feel free to comment. x


Bold Italic font are clickable links.


Thursday, 13 December 2012

DIY Midori Traveler's Notebook Insert


So I recently brought a Midori Traveller's Notebook, after I got it, I saw you could buy a craft paper type notebook for it and after looking at the notebooks I got with it, I realised it would be very easy to make my own.

While in Paperchase I saw this craft paper.  50 sheets for £4 which is quite a bargain compared to the £6 price tag you would pay for a 64 page notebook from Midori. So you are going to get two 50 page books or three 33 page books.  (I've gone for two 30 page books and one 40 page book).

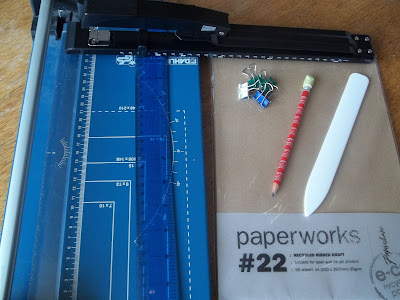
Here is what I used.
Cutter
Ruler,
Pencil
Paper clips
Bone folder
Long reach Stapler
Craft Paper


Take 15 sheets from your pack, this will make a 30 page booklet.

Turn your paper so it's landscape and measure 21.5cm from the left edge and draw a line.

Using the cutter, slice along the line you have just drawn.

You are left with almost a square.  If you look closely there are fine lines on the paper, I have turned the paper so I can use these lines as a writing guide.  You can see the lines more clearly,  further down this tutorial.

Next fold each sheet in half.


Use a bone folder if you have one, it really makes those creases sharp and reduces the bulk.  A big difference huh!

Next, open the pages up and put one on top of the other, line all the centres up and clip them altogether.  Make sure you have the middle crease ridge on the top, so when you staple the pages, the flat edge of the staple is on the outside.

Using your long reach Stapler, staple approx 2cm from the top down the centre crease.  

Repeat at the other end and in the middle.

Fold your booklet together and try opening it up again, does it feel okay? You might be able to see those lines I was on about earlier, in the first picture.


Insert your craft paper notebook into your Traveler's notebook.

Looks as good as any shop bought one.


Top View:                    

Bottom View:

I've opted not to put a cover on this notebook but you could easily use some card stock, I don't want the Organiser to be too bulky so I left the cover off.  You could use any sort of paper to make one of these notebooks, coloured, lined, grid, wallpaper even!  All you need is A4 paper. I might even have a go at making this DIY Pocket I used in my Filofax.  

Alternatively, with different measurements, you could make these to fit into a Filofax or the Filofax Flex.


Hope you enjoyed this tutorial, please leave comments. Thanks x


Midori Traveler's Notebook

I have wondered and pondered on it for ages, but after reading Ray Blake's, My Life All In One Place blog, I finally took delivery of the Midori Traveler's Notebook.  It costs £40 for the leather cover which includes one plain papered notebook, it seems a lot for a piece of leather and a bit of elastic, but I am soooo going to enjoy using this and I'm sure it's going to be worth every penny!

It comes very well wrapped, first a cellophane bag, then a clear plastic wrap, next is a card type wrap with elastic on it, this comes in handy to hold extra inserts.

I didn't know how much it would hold so I only ordered a couple of extra items with it.  I ordered from The Journal Shop, they do free delivery and it came the next day.  How's that for service!

Lightweight paper (013) and  Lined Paper (001)


Zipper Pocket (008)  and  Connecting Bands (021)

Under all that wrapping is a muslin bag with the Notebook inside.  You also get a spare orange elastic, should the one on the Notebook break or you fancy a change.  I've left the original brown one on mine, I'm not a fan of orange and I do like the look of the brown one.


The notebook is slimline and does not come with a pen holder, unless you want to tuck your pen in the middle elastic and this would quite easily work, but I have gone for the Leuchtturm Pen Holder which I got from Rymans for £2.99 and stuck it to the back cover.  Wish they did it in a Brown, but it's not so bad.


My Kingsley Pen is quite chunky and fits in the pen loop well.


So out the cloth bag is this beautiful piece of leather.  But oh my goodness! The smell was pretty horrendous, almost like Turps (the worst smell in the world in my opinion) and it had this powdery white residue, but after handling it for a while the residue disappeared, the smell was still there though. 24 hours later, it's not so bad, smells like......shoe polish!  I think with time, it will fade completely though, I don't want to go messing with it just yet.

As you can see, I added a little charm to the book mark string.  I did have another charm on here, but took it off after realising it can mark the leather quite easily.  I'm looking for a tumbled piece of Amethyst with a hole drilled through...if anyone can advise where to get one from, please could you let me know. Thanks!

So that's my Midori Traveler's Notebook set up, I am going to use it as a journal, I've found some great paper to use, can you see the brown craft paper in the middle, well that's what I will be using. (It's very similar to what you wrap parcels in.) You can buy the craft paper notebook from The Journal shop....but I've made my own....BUT that's another story!

If anyone out there is still undecided on whether to get one of these, my advice is go for it, you will not be sorry.  It is beautiful and the notebooks are very easily made if you don't want to fork out for Midori ones.  Watch this space!


Tuesday, 11 December 2012

Regency Filofax

Look what arrived this morning in the post...... a Filofax Personal Regency in Brown.  How beautiful is she!

Some inserts along with it!

Inside, a brown ruler...never seen these before!

The inside is very similar to the Holborn, with its vertical side pockets on either side of the credit card slots. (A feature that I love in a Filofax!)


Touch wood!  The 23mm rings seem to be in top condition too!  It's lying quite flat when the pages are open up on it.

The contents are on Cotton Cream Paper, it has a far more superior quality to it.
A week on 2 pages.....in lots of languages....takes up a bit of writing space though.

Lined and plain paper:

Lined Alphabet tabs:

To Do Sheets:

Another three pockets are at the back with an elasticated pen loop.  I've inserted some bits to show exactly where these pockets are!


Just look at that Italian leather, it smells great and feels fantastic.  The little bumps remind me of the Ostrich (The only Filofax left on my wish list now! lol)

I ADORE this Filofax and it come as a big surprise to me, that it has the internal vertical pockets like my Holborn.  I never thought I would be swayed away from my Holborns but this one has done it!  


Thanks for reading, leave me a comment if you could!